Creating Postcard Templates
Postcard templates in SendSquared allow you to create reusable designs that can be personalized for each recipient. This guide covers creating, editing, and managing postcard templates.
Accessing Postcard Templates
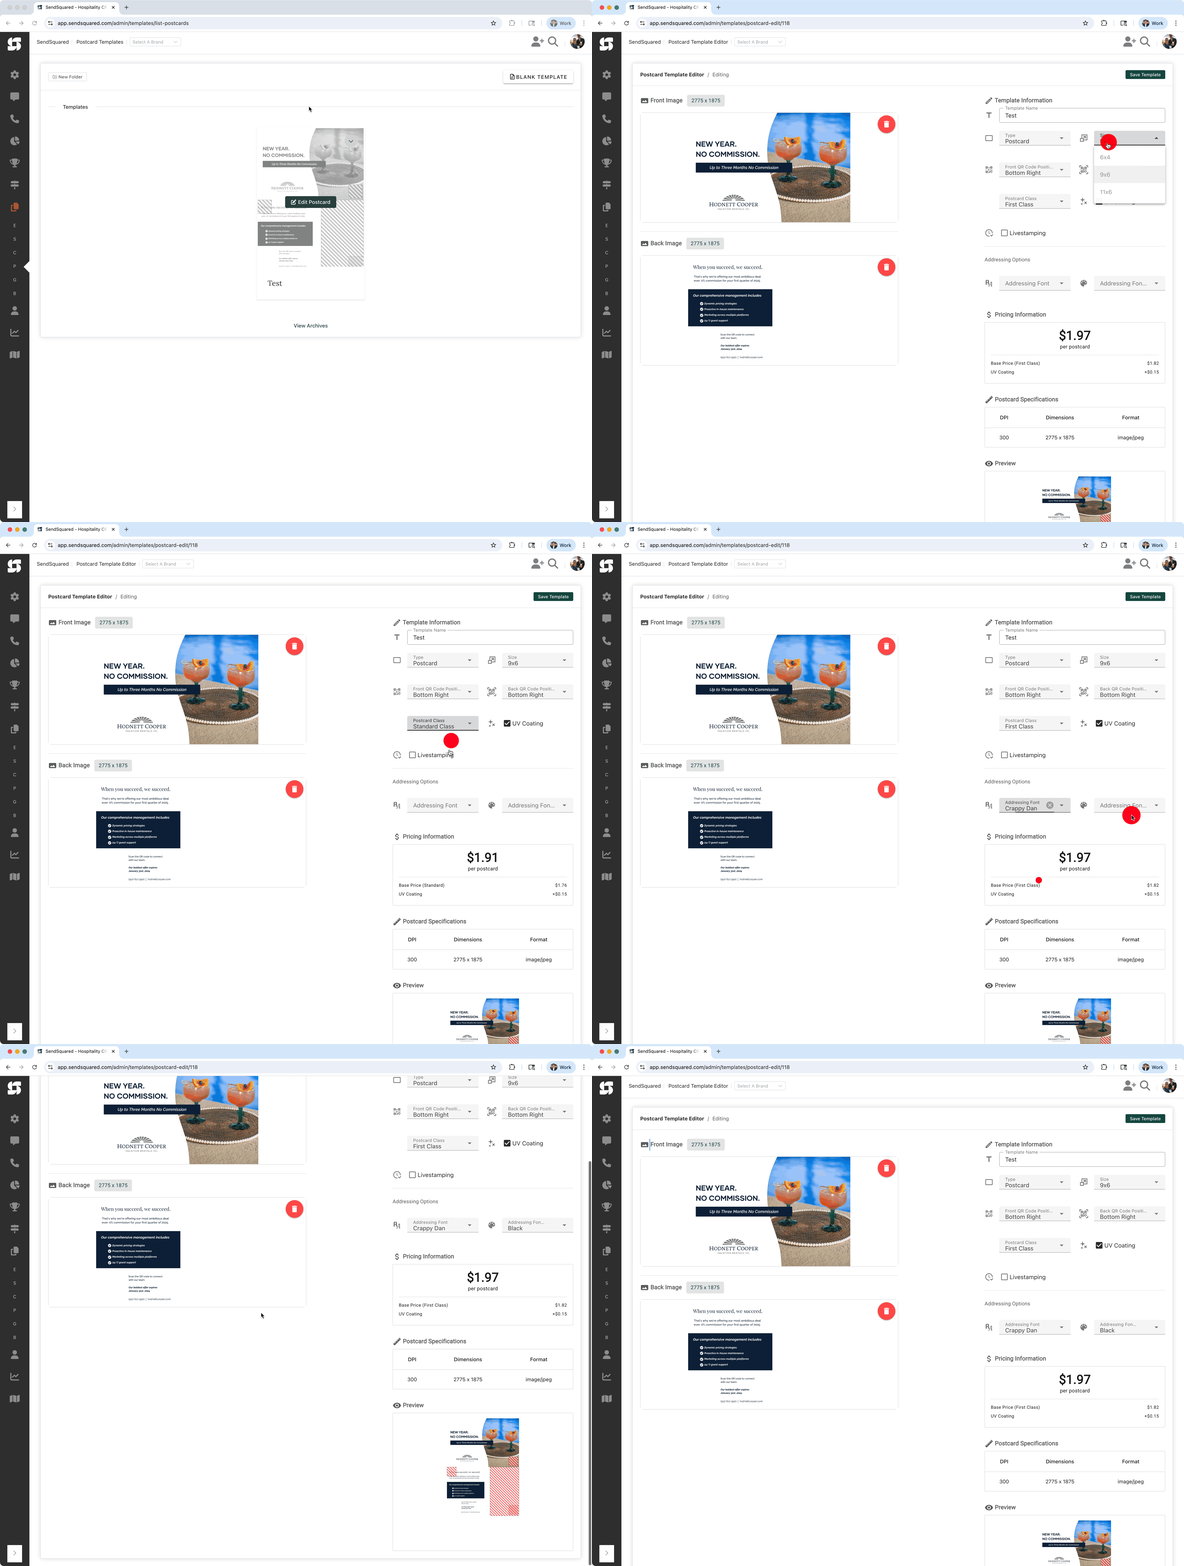
To access the postcard template editor:
- Navigate to Templates in the main menu
- Select Postcard Templates tab
- Click BLANK TEMPLATE button in the upper right corner to create a new template

Template List View
The postcard templates interface displays:
- Template Previews: Visual thumbnails of your postcard designs
- Template Names: Displayed below each preview
- Edit Button: Click the pencil icon or "Edit Postcard" to modify existing templates
- Folder Organization: Use "New Folder" to organize your templates
- Archives Access: View archived templates via the "View Archives" link at the bottom
Template Editor Overview
The postcard template editor provides tools for designing both sides of your postcard:
Editor Interface
- Canvas Area: Visual representation of your postcard
- Tools Panel: Design tools and elements
- Properties Panel: Settings for selected elements
- Preview Toggle: Switch between front and back views
- Save Options: Save as draft or publish template
Design Tools
- Image Tool: Upload and place images
- Background Tool: Set background colors or images
- QR Code Tool: Generate trackable QR codes
Editing Existing Templates
To edit an existing postcard template:
- Locate Your Template: Find the template in the main templates view
- Hover Over Template: The template preview will display an "Edit Postcard" button
- Click Edit: Click either the pencil icon or the "Edit Postcard" button
- Make Changes: The template editor will open with your existing design
- Save Updates: Save your changes to update the template
Quick Actions
- Duplicate: Create a copy of an existing template to use as a starting point
- Archive: Move outdated templates to archives to keep your list organized
- Rename: Click on the template name to rename it
Creating Your First Template
Step 1: Choose Template Size
Select your postcard size:
- 4" x 6" (Standard)
- 5" x 7" (Large)
- 6" x 9" (Jumbo)
Step 2: Design the Front
The front of your postcard typically features:
- Hero Image: Eye-catching visual
- Headline: Brief, attention-grabbing text
- Branding: Logo or company name
- Call to Action: What you want recipients to do
Step 3: Design the Back
The back must include:
-
Message Area (Left side):
- Your main content
- Contact information
- Call to action details
- Legal disclaimers
-
Address Area (Right side):
- Must remain clear for recipient address
- System automatically handles address placement
-
Postage Area (Top right):
- Reserved for postal indicia
- Keep this area completely clear
Design Elements and Formatting
Text Formatting
- Font Selection: Choose from available fonts
- Size: Set appropriate sizes (minimum 8pt)
- Color: Use CMYK-safe colors
- Alignment: Left, center, right, justified
- Spacing: Adjust line and letter spacing
Image Handling
- Upload: JPG, PNG formats supported
- Resolution: 300 DPI minimum
- Positioning: Drag and drop placement
- Sizing: Maintain aspect ratio
- Effects: Basic filters available
Color Management
- Work in CMYK color mode
- Use color picker for consistency
- Save custom color swatches
- Preview how colors will print
Advanced Features
QR Codes
Add trackable QR codes:
- Click the QR Code tool
- Enter destination URL
- Customize appearance
- Set tracking parameters
- Position on design
Template Management
Organizing Templates
- Naming Convention: Use descriptive names
- Categories: Group by campaign type
- Tags: Add searchable tags
- Versions: Track template iterations
Duplicating Templates
To create variations:
- Select existing template
- Click "Duplicate"
- Modify as needed
- Save with new name
Archiving Templates
For outdated templates:
- Select template
- Choose "Archive"
- Template remains accessible but hidden
Testing Templates
Preview Options
- Design Preview: See how template looks
- Data Preview: Test with sample contact data
- Print Preview: Simulate printed output
- Mobile Preview: Check QR code scanning
Test Printing
Before using in campaigns:
- Create test campaign with internal addresses
- Order small batch
- Review print quality
- Check color accuracy
- Verify text readability
Template Best Practices
Design Principles
- Keep design clean and uncluttered
- Use high contrast for readability
- Maintain visual hierarchy
- Include clear call to action
- Test at actual size
Performance Tips
- Optimize image file sizes
- Limit number of fonts
- Use web-safe fonts when possible
- Avoid complex transparency effects
- Test load times in editor
Accessibility
- Use readable font sizes (10pt+)
- Ensure color contrast
- Avoid thin fonts
- Consider colorblind-friendly palettes
- Test with various audiences
Common Template Types
Promotional Postcards
- Special offers
- Seasonal sales
- New product launches
- Grand openings
Event Postcards
- Save the dates
- Invitations
- Reminders
- Thank you cards
Informational Postcards
- Service updates
- Location changes
- Business announcements
- Educational content
Follow-up Postcards
- Appointment reminders
- Service follow-ups
- Feedback requests
- Loyalty rewards
Troubleshooting Template Issues
Design Not Saving
- Check internet connection
- Verify browser compatibility
- Clear browser cache
- Try auto-save recovery
Images Not Uploading
- Verify file format
- Check file size limits
- Ensure proper permissions
- Try different browser
Preview Errors
- Refresh the editor
- Check merge tag syntax
- Verify data fields exist
- Clear preview cache
Next Steps
After creating templates:
- Test with sample data
- Get team approval
- Create template variations
- Document template usage
- Train team members
For more information: