Download Recorded Calls
Call recordings are an essential tool for training, quality assurance, and record-keeping. This guide explains how to locate, play, and download recorded calls in the SendSquared system.
Accessing Call Recordings
There are two primary ways to access call recordings in SendSquared:
- From the Call Log - Access all call recordings across your system
- From Contact Profiles - View recordings for a specific contact
Method 1: Accessing from the Call Log
To access recordings from the main Call Log:
- Log in to your SendSquared account
- Navigate to Call Log in the left-hand side navigation menu under Calls
- Locate the call you want to review in the list
- Find the Recording column for that call
Method 2: Accessing from Contact Profiles
To access recordings for a specific contact:
- Navigate to the contact's profile page
- On the bottom channel bar, click on Call Log
- Review the list of calls associated with this contact
- Find the Recording column for the call you want to review
Playing Call Recordings
Depending on how you access the recordings, the playback method differs slightly:
From the Call Log
- In the Recording column, hover over the "Processed" label
- A popup window will appear with audio playback controls
- Press the play button to listen to the recording
From Contact Profiles
- In the Recording column, click on the Music icon
- A modal window will open with audio playback controls
- Press the play button to listen to the recording
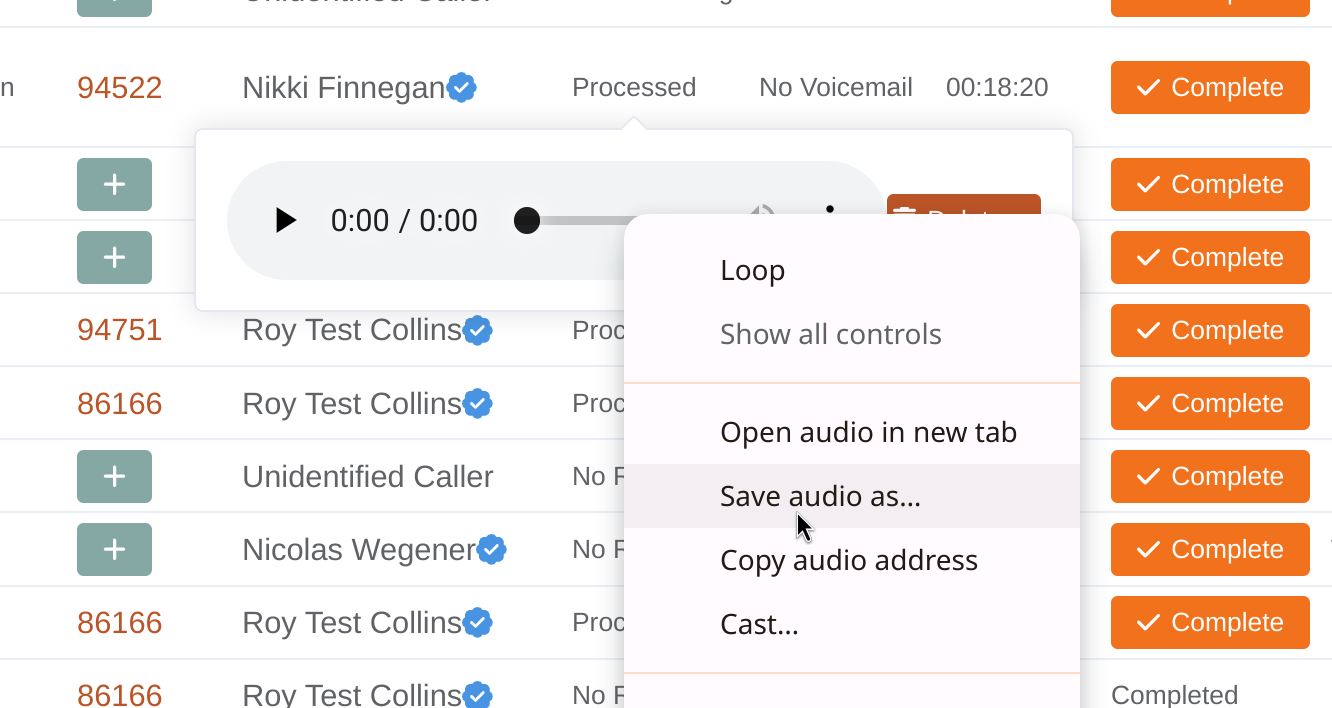
Downloading Call Recordings
Follow these steps to download a recording to your local device:
- Access the recording using either method described above
- Once the playback window or modal is open:
- Look for the three dots menu (⋮) in the player
- Right-click (Windows) or Control-click (Mac) on the three dots
- A dropdown menu will appear
- Select Save audio as
- Choose a location on your computer to save the audio file
- Enter a filename that will help you identify the recording later
- Click Save
Managing Call Recordings
Deleting Recordings
If you need to delete a recording (for privacy or compliance reasons):
- Access the recording using either method
- Look for the delete button (usually a trash icon) next to the playback controls
- Click the delete button and confirm your decision
- The recording will be permanently removed from the system
Best Practices for Call Recordings
- Naming Convention: When saving recordings, use a consistent naming format such as "Date_CallerName_AgentName"
- Organization: Create dedicated folders on your system for different types of calls or time periods
- Retention Policy: Establish and follow a clear retention policy for call recordings based on your compliance requirements
- Security: Store downloaded recordings securely, especially if they contain sensitive customer information
- Training: Use noteworthy recordings for training purposes, highlighting both excellent service examples and areas for improvement
Legal Considerations
- Always ensure your call recording practices comply with relevant laws and regulations
- Depending on your jurisdiction, you may need to inform callers that calls are being recorded
- Consult with legal counsel regarding proper retention and handling of recorded calls